


Use this clipper guard sizes chart to choose the right cutting length, then shop professional clippers and guards at BuyBarber.com.
Professional barbers rely on a clear numbering system to deliver clean fades and consistent results. You need a deep understanding of these tools to maintain precision in a high-volume shop environment.
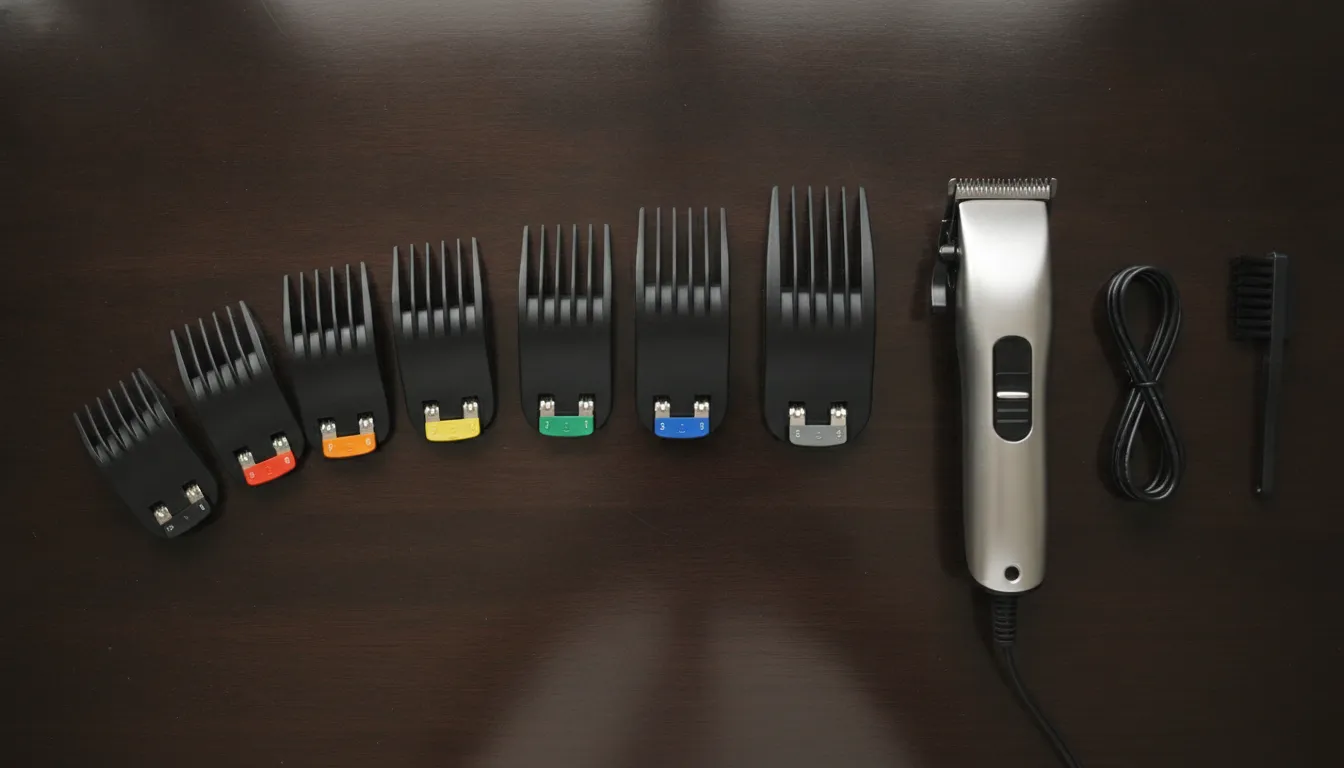
Clipper guard sizes follow a standard numbering system that shows the length of hair left on the scalp after a cut. Most professional brands use a scale from #0 to #8, where lower numbers create shorter fades and higher numbers leave more hair for blending. For example, a #1 guard usually cuts hair to 1/8 inch or 3 millimeters, while a #4 guard leaves 1/2 inch of length. These measurements help barbers talk clearly with clients and repeat results across compatible tools. While most guards are universal, slight brand changes and taper lever settings can change the final look. Mastery of these steps lets you plan your fade with precision to ensure each change creates a smooth transition without visible weight lines.
Clipper guard sizes chart: numbers, inches, and millimeters
Most proper clipper guard sizes follow a simple set of numbers. This system helps barbers and clients talk about hair length. A small number means a short cut. A large number means more hair stays on the head. Using these standard clipper guard sizes ensures that a "number two" in one shop feels the same in another. This kind of steady result is key for any pro shop. It helps you get the right look with every cut.
Standard clipper guard lengths
The numbers on a guard tell you the length of hair left after the cut. For example, a #1 guard leaves about 1/8 inch or 3 millimeters of hair. As the numbers go up, the hair stays longer. A #4 guard leaves 1/2 inch or 13 millimeters. Many pros use clipper guard sets to keep these tools in order. Having a full set allows for smooth blends and fades. It also helps when a client wants a specific style. You can move from short to long with ease.
For most shops, the range goes from 1 to 8. But some brands offer half-sizes like the 0.5 guard. This guard is great for tight fades. It fills the gap between the bare blade and the #1 guard. When you use a standard numbering system, you avoid mistakes. It is the best way to get the same result every time you pick up your tools. Clear numbers make the job much faster for the barber.
| Guard Number | Length (Inches) | Length (Millimeters) |
|---|---|---|
| #0.5 | 1/16" | 1.5 mm |
| #1 | 1/8" | 3 mm |
| #2 | 1/4" | 6 mm |
| #3 | 3/8" | 9 mm |
| #4 | 1/2" | 13 mm |
| #5 | 5/8" | 16 mm |
| #6 | 3/4" | 19 mm |
| #7 | 7/8" | 22 mm |
| #8 | 1" | 25 mm |
| #10 | 1 1/4" | 32 mm |
How the taper lever changes length
The taper lever on your clippers is a useful tool. It lets you change the cut without swapping the guard. Moving the lever open or closed makes a small shift in length. Most levers change the cut by about 1/16 of an inch. A closed lever gives you the shortest cut for that guard. An open lever makes the hair a bit longer. This small shift is vital for a clean fade. It helps you blend two different lengths without a visible line.
For instance, an open #1 guard leaves more hair than a closed #1 guard. An open #1 guard leaves about 3/16 inches of hair. This is because you add 1/16 inch from the lever to the 1/8 inch from the guard. This trick helps barbers erase lines in a blend. It gives you more control over the final look of the hair. You can match the length to the client's head shape with ease.
Why guard sizes vary by brand
While the numbers are standard, there are small shifts between brands. A Wahl #2 might feel a bit different than an Andis #2. This is often due to the space between the blade and the scalp. The thickness of the plastic can also play a role. Pro barbers often stick to one brand for their main tools. This helps them stay fast and sure in their work. It is always smart to check the label on the guard itself to be sure of the length.
Choosing guards for different hair types
Hair texture and density change how a guard works on the scalp. For thick or coarse hair, you may want to use a larger guard size to get an even cut. This stops the clippers from pulling or snagging. Lower guard numbers offer a very precise look. Higher guard numbers create a more relaxed style. Testing the guard on a small area first is a pro move. It confirms the visual result before you cut the whole head. Using a clear chart keeps your work sharp for every client.
How does the taper lever change guard length?
The taper lever is the small arm on the side of your clippers. It is a vital tool for any pro barber. When you move this lever, you change the space between the two blades. This shift happens even when you do not swap your clipper blades. It allows you to fine-tune the cut between fixed guard sizes.
Closed vs open lever settings
Most clippers have two main settings for the lever. When the lever is pushed all the way up, it is "closed." At this point, the moving blade is as close as it can get to the still blade. This gives you the shortest cut. When you pull the lever down, it is "open." This moves the blades further apart, which leaves the hair a bit longer.
On most pro tools, the lever adds about 1/16 of an inch when you open it. This small change is a huge help when you are blending. For example, a #1 guard cuts hair to 1/8 inch when the lever is closed. If you open the lever with that same guard, the hair stays at about 3/16 of an inch. This small step helps you find the proper clipper guard sizes for a clean blend.
Blending with clipper guard sizes
Fixed guard sizes often leave big gaps. A #1 guard is 1/8 inch, and a #2 guard is 1/4 inch. That jump is easy to see on the scalp. The taper lever fills this space by creating middle lengths. You can set the lever halfway to create a "half-step." This bridges the gap between the two guards.
Some clippers use "clicks" or notches to help you find these middle spots. Others move freely, so you have to feel for the right spot. This control is key because hair texture and density can change how a guard works. Thicker hair might need a new lever spot to look even. The lever lets you make these small changes on the fly as you cut.
Why lever settings matter for fades
A high-end fade needs a smooth shift from the skin to the top hair. If you stay in just one lever setting, you will leave a "weight line." Moving the lever as you work up the head is the best way to remove these lines. Barbers call this "lever play." You start with the lever closed at the bottom and slowly open it as you move higher. This creates a soft blur that looks great.
The lever also helps you fix small errors. If you see a dark spot in the fade, you can close the lever a bit and tap it out. If a spot looks too light, you can open the lever to leave more hair. This tool lets you fix problems without changing your clipper guard sizes. It saves time and makes your work clean. For any barber, learning the lever is just as vital as knowing your guard numbers.
Are clipper guards universal across brands?
Most people think all clipper guards fit all clippers. This is a big mistake that can cost you money. Many brands use a standard way to label clipper guard sizes, but the parts do not always swap. You must know how each brand builds its tools. This helps you avoid buying the wrong set for your shop.
Snap on vs magnetic fit styles
The way a guard sticks to the blade is key for a safe cut. Some brands use strong magnets to hold the plastic in place. Other brands use a snap on style with a small clip. Magnetic guards are liked in busy shops. They are fast to change and stay very steady as you work on thick hair. You can read more on the proper clipper guard sizes and how to use them.
Putting a magnetic guard on a clipper made for snap on guards often fails. The guard might slip or shake while you work. This can ruin a hair cut and cause stress for you and your client. Always check the fit before you turn on the tool. If it feels loose, do not use it.
Why brand design matters for fit
Even when guards look alike, they often vary by tiny amounts. Brands like Wahl, Andis, and BaBylissPRO build tools to work with their own blades. A guard made for a Wahl tool might not fit an Andis blade well. The width of the blade and the shape of its teeth must match the guard. If the fit is loose, the blade can hit the plastic and break the guard.
According to professional barber guidance, other brands label guards the same way, but the real cut depth can change. A #1 guard from one brand might leave a length that is not the same as a #1 from a new brand. This is why many pros stick to one brand for their whole set. It helps keep the fade looking smooth and clean on the head.
Tips for checking your guard set
Before you buy new parts, look at how your clipper holds the guard. Most pro tools use either a taper blade or a fade blade. These blades have different shapes and widths. Common brands that need specific guards include:
- Wahl pro blades
- Andis Master tools
- BaBylissPRO metal blades
- Oster classic tools
Some guards are sold as "common fit," but this term can be tricky. It often means they fit a few brands, but not every tool ever made. Do not trust a label that says "fits all" without a test.
You should also look at the parts of the set. High end guards often use tough plastic or metal clips for a tight fit. Pro guards are built for long service life and reliable work in busy shops. Cheap guards may flex too much. This leads to a rough cut. If you are not sure, stick to guards made by your tool brand. This makes sure you get a safe result every time.
Checking the taper lever is one more key step. When you move the lever, it changes the cut length. This adds about 1/16 of an inch to the cut. If your guard does not fit right, moving the lever might cause the blade to hit the guard. Always test a new guard on a small spot before you start a full cut. This small check saves your tools and keeps your clients happy.
How to choose the right guard for a haircut
Picking the best proper clipper guard sizes is a core skill for any pro. It is not just about the length of the hair. You must think about the final look and the hair type of your client. A good barber looks at the head from all sides before they start. This helps them find the right guard for the job. If you pick the wrong one, you might cut too much or leave the hair looking messy. You want every cut to be clean and even for your clients.
Check hair thickness and growth
You should always look at the hair feel first. Thick or coarse hair can be tricky to cut. It often needs a larger guard to get a smooth, even look on the scalp. If the hair is very thick, a small guard might snag or pull on the strands. For these clients, a larger guard size helps you work faster and better. It keeps the client happy and saves you time in the chair. You want to make sure the clipper moves well through the hair.
Thin hair needs a new touch. A small guard on thin hair might show the scalp more than the client wants. You must also look at how the hair grows. Growth patterns can bend or block the clipper path. If the hair grows flat, you may need to go over it a few times. Knowing your clipper guard sizes helps you avoid these common traps. It ensures the hair is the same length all over the head.
Plan the fade blend
A clean fade needs a clear plan from the start. You must decide on the level of the fade. Will it be a low, mid, or high fade? Each one uses another set of guards. For a low fade, you might start with a larger guard at the very bottom. You then move to smaller guards as you go up. A high fade works the other way. You might start with the bare blade at the bottom and step up in size. This plan keeps your blends smooth and sharp every time.
Planning helps you see where the hair needs to be dark or light. It also stops you from making the blend too high on the head. You can use the taper lever to help with this. Moving the lever changes the cut by about 1/16 of an inch. This small change is great for fixing lines between two guard sizes. It gives you more control over the look. You can blend the hair without leaving any harsh lines in the style.
How to talk to your client
You must talk to your client before you cut. Ask them how short they want the sides to be. If they are not sure, show them a guard. You can say, "This is a number two, and it will leave about a quarter inch of hair." This helps them see the final length in their head. It also builds trust between you and the client. You should also ask where they want the blend to sit. A high blend looks very sharp, while a low blend is more classic. Using clear words helps you get the best result for everyone.
A simple choice process
Use this process to pick the right guard for every client who sits in your chair.
- Ask the client how short they want their hair and what style they like.
- Run your hands through the hair to feel for bumps or changes in hair thickness.
- Pick a guard that is one size longer than the target length to test the look first.
- Hold the clipper flat and move it against the grain of the hair growth.
- Adjust the taper lever to open or closed to fine-tune the length as you blend.
- Look at the blend from a distance to find any heavy spots that need more work.
Fixing the cut is the last step. Even with the right guards, you may need to do more work. Sometimes a quick pass with a half-guard is all you need to finish the blend. Other times, you might use a comb and scissors to clean the top part. The goal is a look that is smooth and clean. Always check your work in a mirror before the client leaves. This lets you see the cut the same way they will. It helps you catch any stray hairs or uneven spots before they stand up.
Using guard numbers for fades and tapers
Fades and tapers rely on a smooth shift from short hair to long hair. To get this look, you must know how clipper guard sizes work together. A fade often starts very short at the bottom and grows longer as you move up the head. A taper is much the same but often covers a smaller area like the sideburns or the neck. In both cases, the numbers on your guards tell you how much hair will stay on the scalp.
Start with longer guards to find the shape
The best way to start a blend is to use a guard that is longer than what you want for the final look. This is a safe move for any barber. If you start too short, you cannot fix it. By using a larger size first, you can see how the hair lays. Most pros start with a #4 or #3 guard at the top of the fade line. This helps you set the bulk and see where the blend needs to go. As you work down the head, you will swap to smaller numbers.
Standard clipper guard sets follow a simple path from #1 to #8. Each number marks a set length. For instance, a #1 guard leaves about 1/8 inch of hair, while a #4 guard leaves 1/2 inch. You can see the full list of lengths in this clipper guard chart above. Knowing these lengths helps you plan your steps before you turn on the clipper. It ensures the shift looks clean and even all the way around.
Erase guide lines with the taper lever
The gap between two guard sizes can leave a clear line in the hair. These are called guide lines. To erase them, you must use the taper lever on the side of your clipper. When the lever is closed, the blade cuts the hair at the exact length of the guard. When you open the lever, it moves the blade back slightly. This adds about 1/16 of an inch to the cut. This small change is the secret to a perfect blend.
Say you have a line between a #1 and a #2, you do not just jump between them. You start with the #2 closed, then move to the #1 with the lever fully open. This lever play helps you hit the lengths in between the main numbers. It softens the edge so the eye cannot see where one length ends and the next begins. You should move the clipper in a flicking motion to help the hair blend into the longer parts above.
Use half guards for the tightest blends
Sometimes the jump between a bare blade and a #1 guard is still too big. This is where the 0.5 guard, or half guard, comes in. It gives a length that sits right in the middle of those two settings. Using proper clipper guard sizes like the 0.5 guard makes it easy to fade into the skin. It removes the dark spots that often show up in very short haircuts. Many barbers find this guard vital for modern skin fades.
- Keep your blade tension and blade depth the same to avoid gaps.
- Work in small parts to keep the fade height level.
- Always test a guard on a small spot before you cut a large area.
- Brush away cut hair often so you can see your work clearly.
Good fades also need you to watch the growth path of the hair. Hair does not always grow straight down. You may need to change the angle of your clipper to catch every strand. If you use the same pressure and a steady hand, your guards will do most of the work for you. Clean work takes time, so do not rush the lower parts where the hair is shortest.
Frequently asked questions about clipper guard sizes
What length does a number 1 clipper guard leave?
A standard number 1 guard is labeled to leave about 1/8 inch, or 3 millimeters, of hair. The final result can vary slightly with the clipper blade, taper-lever position, cutting direction, and hair texture, so verify the marking on your specific guard.
What is the difference between a number 2 and number 3 guard?
A number 2 guard is commonly labeled 1/4 inch, or 6 millimeters, while a number 3 is commonly labeled 3/8 inch, or 10 millimeters. The number 3 therefore leaves visibly more length and is useful when a client wants fuller coverage.
Does opening the clipper lever make hair longer?
Yes. Opening the taper lever moves the cutting blade farther from the stationary blade, which generally leaves more hair. Because the added length differs by clipper and blade system, use the lever as an adjustable blending range rather than assuming one universal measurement.
Can any clipper guard fit any clipper?
No. Guards can differ in blade width, attachment method, rail shape, and magnet or clip placement. Confirm that the guard set lists compatibility with your exact clipper model before buying or placing it into service.
Ready to find the right expert clipper guards for your shop?
Using old or bad guards leads to uneven lines and slow work that drives your best clients away, so you should update your gear today. If you wait to replace your worn tools, you risk losing money on slow fades while other barbers in town take your top customers right now. You can check our list of clipper blades and guards to find the exact match for your own brand and model at BuyBarber right now.
Ready to improve your guard setup? Shop professional clippers and compatible accessories at BuyBarber.com, or call (702) 900-9972 for help.


