


Shop Professional Barber Clippers and Replacement Blades at BuyBarber.com
How to adjust hair clippers is a basic skill every pro barber needs to deliver clean cuts without skin pain. Proper adjustment involves aligning the top cutting blade so it sits between 1/32 and 1/16 of an inch behind the bottom stationary blade to prevent skin nicks. You must also set the power screw to balance motor speed and noise, ensuring the tool runs at peak power. Regular care, including cleaning after every service and applying professional clipper oil, reduces friction and heat that can dull blades too soon. According to BuyBarber.com, precise zero-gap adjustments allow for the closest possible skin fades but need extreme care to avoid causing painful skin irritation or cuts. Mastering these setup steps ensures your equipment lasts longer and performs well throughout a busy shop shift.
How To Adjust Hair Clippers: Why Proper Clipper Calibration Matters in the Barbershop
Every barber knows that their tools are the heart of their work. When you learn how to adjust hair clippers, you do more than just fix a dial. You make sure your gear stays in top shape for every cut. It keeps your blades sharp and your motor running well. This focus on care is what sets a pro shop apart from the rest.
Protect your tool buy
Pro gear costs a lot of cash. You want your gear to last as long as it can. Regular care and oiling are key to the life and work of your tools. If your blades do not line up, the motor has to work too hard. This extra heat can wear out the parts inside your tool. Over time, a poorly set tool will fail much faster than one that is well-kept.
Keeping your gear clean and set right also helps you work fast. You do not have to fight with your tools to get a clean line. When your blades move the way they should, you can move through your day with ease. This means you can see more folks and keep your shop busy. Buying pro clippers is just the first step. Keeping them fit through careful change is how you get the most for your money.
Improve client comfort and safety
A bad cut can hurt a client and ruin your shop's name. Blades that are out of place can pull hair or nick the skin. This leads to red marks and pain for the person in your chair. You must make sure your blades are flat and even. Even small T-blades for fine detail work need to be set right. This is true for different clipper blade types, as they get very close to the skin.
Safe tools are just as vital as clean ones. When you know how to set your blades, you lower the risk of small cuts. These nicks can let germs spread from one person to the next. High standards for tool care show your clients that you care about their health. This builds trust and keeps them coming back to your shop. A well-set tool makes every fade look better and every client feel safe in your care.
Master the art of the perfect cut
Good hair cuts need great tools. If your blades are not set right, your fades will look uneven. You might see lines in the hair that you did not want. This happens when the cutting blade and the still blade do not line up. Proper set-up makes sure the hair is cut clean the first time. You won't have to go over the same spot twice. This saves you time and keeps the skin from getting red.
Learning to tune your gear gives you more power over your work. You can set your tools to cut just how you like. Some barbers like a very close gap for skin fades. Others want a bit more space for bulk work. When you master these changes, you can use your gear to its full power. This skill is a must for any barber who wants to be at the top of their game. It ensures that every service you give is of the best quality.
How to Align Hair Clipper Blades: A Step-by-Step Guide
Crooked blades are a big problem for any busy barber. They can pull on hair or leave messy lines in a fresh fade. Even worse, a blade that sits too far forward can nick a client's skin. Learning how to adjust hair clippers is a key skill for every pro. It keeps your tools safe and helps them last much longer.
The Risks of Poor Alignment
When your blades are not straight, they create extra heat and rub. This heat can burn a client or warp the metal over time. Proper tool care is vital for shop safety and good work. If the teeth are not even, the clipper has to work harder to cut through thick hair.
This extra strain can slow down your motor or cause it to fail. You should check your blade set at the start of every day. A quick look can save you from a bad cut or a broken tool. Most top brands like Wahl and Andis use a two-bolt system that is easy to fix with a simple tool.
Achieving the Zero Gap
A zero-gap setup brings the cutting blade very close to the guard blade. This setup allows for a super close shave and sharp lines on the neck. It is the best way to get a clean finish on a bald fade. But you must be very careful when you set this up.
If the moving blade sticks out past the still blade, it will cut the skin like a razor. You must always keep a small gap between the two sets of teeth. This gap acts as a safety wall for your client. Aim for a gap as thin as a piece of paper to stay safe while getting a close cut.
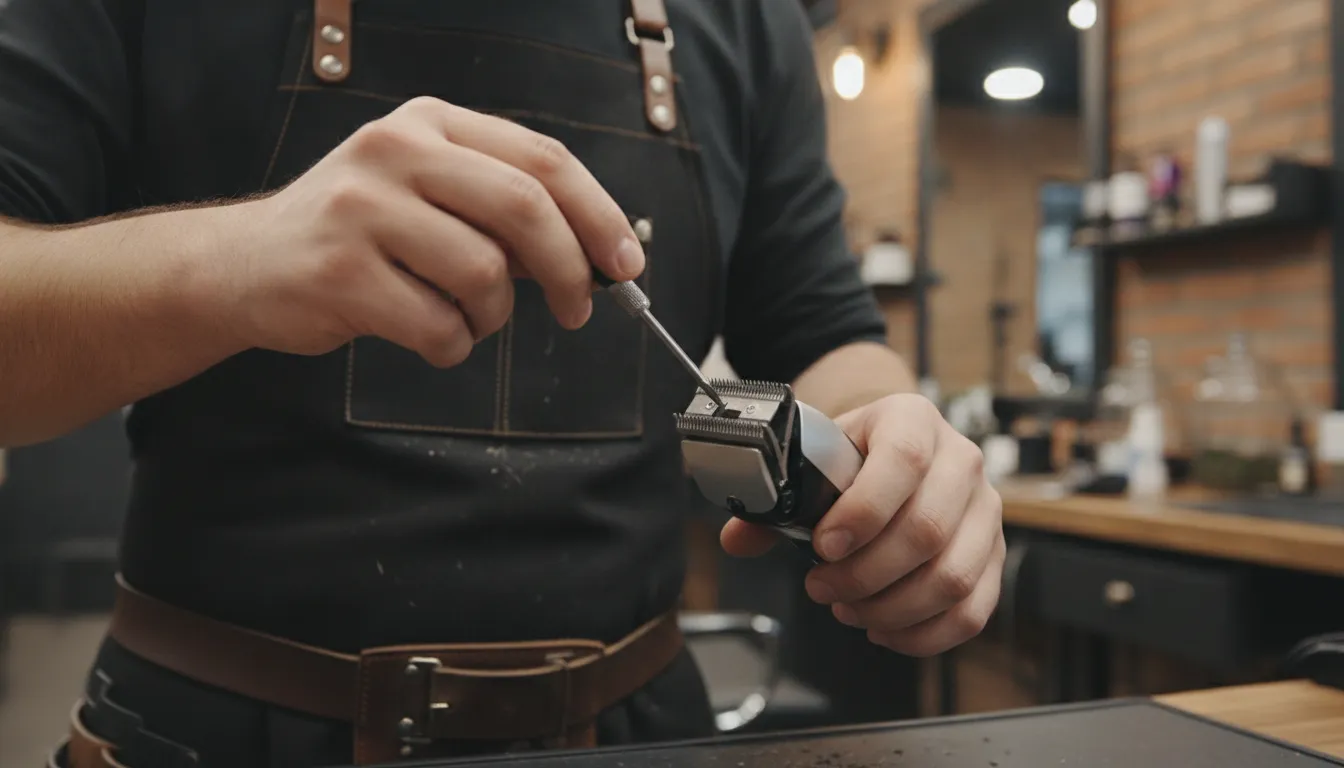
- Start by cleaning your tools. Remove all hair and old oil so you can see the bolts clearly.
- Use a tool to loosen the two bolts on the back of the blade. Turn them just enough so the blade can move.
- Push the small cutting blade up toward the edge of the large guard blade. Do not let it go past the edge.
- Make the blades very straight. Use the guide marks on the blade if your clipper has them to help you line them up.
- Hold the blades in place with your thumb. Tighten one bolt halfway, then do the same for the other bolt.
- Look at the blades from the side to check the gap. The moving blade should be a tiny bit behind the still blade.
- Once you are happy with the look, tighten both bolts all the way. Do not force them too hard or you might strip the metal.
Testing the Alignment
Once you properly align new clipper blades, you must test them. Turn the clipper on and listen for any odd noise. A loud buzz often means the blades are too tight or not straight. You can also run the teeth across your palm to feel for any sharp spots.
If the blades feel smooth and stay cool, they are ready for use. Finish the job by adding three drops of clipper oil to the teeth. Regular oiling reduces wear and helps the blades slide without catching hair. This simple step keeps your gear running well for a long time.
Calibrating the Power Screw and Tuning the Clipper Motor
Expert barber tools need more than just a drop of oil to work well. If you use corded tools, you must know how to adjust hair clippers with the power screw. This small part on the side of the tool tells the motor how hard to pull. It helps you match the tool speed to the power in your shop. When the motor is out of sync, the blades will pull or snag on hair. This makes for a bad cut and can even hurt the client.
Finding the best power level
Most Wahl tools have a screw on the right side of the case. To start, you should first turn the tool on. Hold it in the air and turn the screw slowly to the right. Do this until you hear a loud, sharp noise. This sound means the motor arm is hitting the side of the case. Once you hear it, turn the screw back to the left. Stop the moment the noise goes away. This point is where the tool has the most power.
Adjusting for shop power
Power levels in a shop can change during the day. If many tools run at once, the power flow might drop. You may notice your clippers feel weak or lose their punch. If this happens, you should turn the screw to the right just a tiny bit. You can also troubleshoot and maintain your clippers to see if the parts are worn out. A well-tuned tool stays cool and runs smooth for every cut. This keeps your hand from getting tired and makes fades look clean.
Health risks of poor tuning
Keeping your tools in top shape is about more than just a fast cut. When a motor runs poorly, the blades might grab and nick the skin. This creates a real risk for the people in your chair. A study shows that clippers can carry blood-borne viruses like Hepatitis B if they are not safe. Good tuning helps the blades cut hair without pulling at the skin. This lowers the chance of small cuts and keeps your shop safe for all.
Regular checks for peak work
You should check your power screw once a week. Work and use can make the screw move over time. If the tool feels too hot, the motor may be working too hard. Try to turn the screw to the left to see if it cools down. If the tool is still loud, check the blade screws too. When you keep the motor and blades in sync, you get the best results. This lets you focus on the art of the cut rather than fighting with your gear.
Solving Rattling Noises and Advanced Clipper Troubleshooting
Loud clippers can be a sign of motor strain or loose parts. Pro tools often get a rattle after long use. If your gear sounds like it is shaking apart, you need to check a few key areas. Most noise issues come from simple parts that just need a quick turn of a tool.
Fixes for Shaking and Rattles
For corded clippers, the power screw on the side is the most common fix. This screw sets the tension on the motor spring. If it is too loose, the motor will clatter against the casing. If it is too tight, the tool will not turn on or will lose power. You should turn the screw clockwise until you hear a loud buzz. Then, slowly turn it back until the sound goes away. This helps you find the best power level for your own motor.
If the rattle is at the head of the tool, check your blade screws. A loose blade can shake and make a high buzz or a deep clank. You should troubleshoot and maintain your clippers by checking these screws often. Tighten them firmly but do not strip the threads. A stable blade set ensures the motor can drive the cutting teeth without losing speed. or making noise.
Common Cutting Problems
Hair clippers face many daily strains in a busy shop. Heat, hair gunk, and old oil can slow down the motor or make the blades feel dull. Use the table below to find quick fixes for common tool problems. Finding the cause early can save you from buying a new tool when a simple fix is all you need.
| Problem | Likely Cause | The Fix |
|---|---|---|
| Loud Rattling | Loose power screw | Adjust screw to find the sweet spot. |
| Pulling Hair | Dull or dry blades | Clean and oil blades immediately. |
| Excess Heat | Friction buildup | Apply oil or use DLC blades. |
| Weak Cutting | Gunk inside case | Open the case and brush out hair. |
| Harsh Buzzing | Spring wear | Check and replace motor springs. |
High heat is a big problem during long fades. Metal-on-metal friction creates heat that can burn a client's skin. To solve this, you can use blades with a DLC coating for better heat control. These Diamond-Like Carbon parts have higher hardness and resist heat much better than standard steel. They stay cool to the touch even after several back-to-back haircuts.
Tool Health and Safety
Keeping your tools clean is about more than just noise. Gunk and old hair can trap germs and cause clogs. The CDC states that regular care and proper oiling are vital for tool life and health. When you keep your gear in top shape, you ensure every cut is smooth and safe. A well-oiled motor runs quieter and lasts longer, which keeps your shop running at full speed.
If your clippers still pull hair after oiling, the blades may be out of line. Small drops or bumps can knock the teeth out of place. Lining up the blades is a basic skill for any pro. You'll need a steady hand and a flat surface to make sure the teeth are straight. Once they are set, the pulling will stop and the cut will look much cleaner.
Regular Clipper Blade Maintenance and Lubrication
Keeping your tools in top shape is the best way to ensure they last for years. Pro hair care depends on clean gear that works well every time. When you learn how to adjust hair clippers, you must also learn how to clean and oil them. Daily care stops parts from wearing out too fast. It also keeps your cuts smooth and clean for every client.
Daily Cleaning for Better Work
.You should clean your clipper blades after every single cut to remove hair and skin cells. This debris can build up and cause the blades to drag or pull. Using a small brush to sweep away hair is a good first step. Then, you should use a spray or wash to kill germs. A clean tool is safer for the scalp and helps prevent the spread of skin issues. Following basic hygiene rules is a must for any pro shop.
Deep cleaning is also needed to stop the growth of germs on the blade set. Research shows that clippers used without cleaning can carry harmful germs. You can use a special blade wash to strip away old oil and dirt. This step keeps the metal bright and ready for the next day of work. It only takes a few minutes but makes a big difference in how your tools feel.
.Oiling Blades to Protect the Motor
Oiling your blades is just as vital as cleaning them. You should apply oil before you start work and after you clean the blades. This oil reduces friction between the moving parts, which stops heat from building up. If the blades get too hot, they can burn the skin or slow down the motor. Using the right oil keeps the metal parts moving freely without any sticking or jumping.

The health of your clipper motor depends on how well you care for the blades. When blades are dry, the motor has to work much harder to move them. This extra stress can lead to a shorter life for your gear. Proper tool care is a key part of good shop habits. It ensures that your clippers stay powerful and quiet through a long day of busy fading and blending.
Mastering the taper Lever Setting
Most pro clippers have a taper lever on the side that lets you change the cutting length. This lever moves the top blade closer to or further from the bottom blade. It is a great way to blend hair without changing guards all the time. Learning to adjust your clippers for a closer cut is easier once you master this lever. It gives you more control over the fade and helps you reach tight spots.
Always check that the lever moves smoothly and stays in place during use. If it feels loose, you may need to tighten the screw that holds it. This small change helps you stay precise while you work. A well-set lever makes the job faster and gives a better look to the final cut. Take the time to test the lever range before you start a new style. This habit helps you get the best results from your pro tools.
Frequently Asked Questions
What is the difference between a taper blade and a fade blade?
Taper blades have a curved back and clear ridges that help with bulk hair cutting and blending. Fade blades are flat and thin, letting the teeth sit much closer to the skin for tight fades. Per BuyBarber, picking the right blade shape is the first step in proper clipper setup. Barbers often keep both types on hand to handle many hair lengths and styles well throughout the work day.
What material is best for clipper blades?
Stainless steel is a top choice because it is tough and resists rust well. However, new coatings like Diamond-Like Carbon (DLC) offer even more hardness and heat strength. Per BuyBarber, these parts help the blades stay cool and sharp for a long time. Using good parts means you do not have to sharpen or replace your blades as often. This saves money and keeps your tools ready for every client.
What are detachable clipper blades used for?
Detachable blades allow for quick swaps between other cutting lengths without using plastic guards. These tools are great for heavy bulk cutting and varied grooming tasks because they keep a steady cut depth. As shown in the BuyBarber guide, these blades provide the freedom needed for busy shops. They are a good choice when you need to switch sizes fast while keeping the motor running at a steady speed for thick hair.
Are T-blades better than standard clipper blades?
T-blades are not always better, but they work in other ways than standard blades. Their unique shape extends past the clipper body, making them the best choice for fine detail work, crisp lines, and grooming around the ears. Per The Barber Expert, these blades are needed for finishing a cut with care. While standard blades handle the main haircut, T-blades provide the sharp edges that define an expert look and keep clients coming back.
Ready to Elevate Your Barbershop's Performance?
Properly adjusting and calibrating your professional hair clippers is a hallmark of elite barbering. When you maintain your equipment to absolute perfection, your fades blend smoother, your lines snap crisper, and your clients stay completely safe from irritation and skin nicks. Peak shop performance demands the absolute best gear and reliable wholesale supplies.
At BuyBarber.com, we specialize in providing professional-grade barber tools, wholesale grooming essentials, and authentic replacement parts at unbeatable prices. Whether you are stocking a multi-chair shop or upgrading your personal workstation. Our massive selection of premium brands, including Andis, BaBylissPRO, Wahl, and JRL, ensures you always work with elite precision. Plus, our Best Price Guarantee and 365-day return policy mean you can invest in your craft. With total peace of mind.
Do not let misaligned blades or sluggish motors hold your business back. Take action today to give your shop the competitive advantage it deserves. Join the BuyBarber.com Trade Program for wholesale pricing and elite gear or reach out to our dedicated support experts at (702) 900-9972 to get started.


